Homemade Cherry Juice: 8 Easy Steps to a Refreshing Drink
There's something uniquely satisfying about sipping a glass of freshly made juice, especially when it’s bursting with the vibrant flavor of ripe cherries. Homemade cherry juice offers a perfect balance of sweet and tart, making it an incredibly refreshing beverage. Beyond its delightful taste, this ruby-red elixir is packed with antioxidants and boasts numerous health benefits, from promoting better sleep to aiding muscle recovery after a workout. If you've ever wondered how to make cherry juice that's far superior to store-bought varieties, you're in the right place. This comprehensive guide will walk you through eight simple steps, ensuring you create a delicious, nutrient-rich drink from the comfort of your kitchen.
Making your own cherry juice at home is surprisingly straightforward, requiring just a few basic ingredients and pieces of equipment. Not only does it allow you to control the quality and sweetness, but it also ensures you're getting the purest form of this incredibly beneficial fruit. Get ready to transform fresh cherries into a truly invigorating drink that your taste buds and body will thank you for.
The Essentials: What You Need to Get Started
Before diving into the juicing process, gathering your tools and ingredients is crucial. Having everything at hand will make the experience smooth and enjoyable. Here’s a breakdown of what you’ll need:
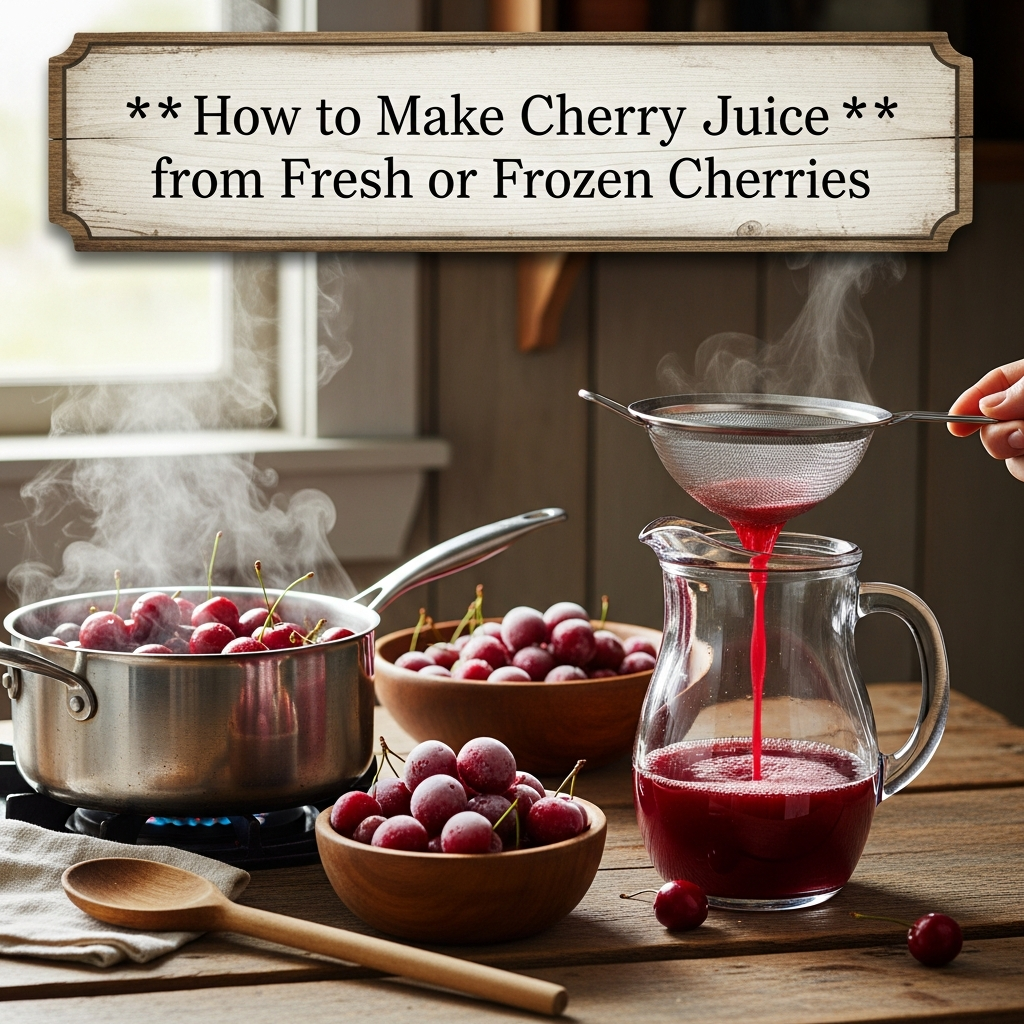
- Fresh Cherries: Approximately 2-4 cups (about 1 pound) of fresh cherries. The quantity can be adjusted based on how much juice you desire. Both sweet cherries (like Bing or Rainier) and tart cherries (like Montmorency) work wonderfully, each offering a distinct flavor profile. Tart cherries are often favored for their higher concentration of beneficial compounds, while sweet cherries create a naturally sweeter juice. If fresh aren't available, frozen cherries can also be used – just thaw them slightly first.
- Water: About 3 cups. This helps to thin the concentrated cherry pulp and adjust the consistency of your juice. You can always add more or less depending on your desired thickness and flavor intensity.
- Blender or Juicer: Your primary tool for extracting the juice. A high-speed blender is excellent for creating a pulpier, fiber-rich juice that can then be strained, while a dedicated juicer will yield a clearer, pulp-free liquid directly. For a detailed comparison and guide on using both, check out our article: Make Fresh Cherry Juice: Your Blender & Juicer Recipe Guide.
- Cherry Pitter: While not strictly essential (you can pit by hand or with a knife), a cherry pitter significantly speeds up the process and prevents stained fingers. Various types exist, from single-cherry pitters to multi-cherry gadgets.
- Measuring Cups: For accurate ingredient proportions.
- Fine-Mesh Strainer or Cheesecloth: Essential for separating the juice from the pulp, ensuring a smooth, clear beverage. A nut milk bag also works exceptionally well for this.
- Large Bowl or Pitcher: To collect the strained juice.
- Storage Container: An airtight pitcher or bottle for refrigerating your finished juice.
With these items ready, you're well-equipped to create your very own batch of homemade cherry juice.
Your Step-by-Step Guide: How to Make Cherry Juice at Home
Now that you have all your supplies, let's dive into the simple process of making fresh cherry juice. Follow these steps, and you'll be enjoying a delicious and healthy drink in no time!
-
Wash Your Cherries Thoroughly:
Before anything else, give your cherries a good wash. Place them in a colander under cool running water and gently agitate them to remove any dirt, dust, or potential pesticide residues. This step is particularly important for non-organic cherries. After washing, gently pat them dry with a clean cloth or allow them to air dry for a few minutes. Excess water can dilute the juice's flavor.
-
Pit Those Cherries Like a Pro:
This is perhaps the most time-consuming part, but absolutely crucial. Removing the pits is essential for a smooth, enjoyable juice and to avoid any bitter flavors. If you have a cherry pitter, it's a breeze: simply place each cherry in the pitter and press. If you don't have one, you can use a small knife to cut around the pit, or even a chopstick or sturdy straw to push the pit out. Work over a bowl to catch any escaping juice – every drop is precious!
-
Blend to Perfection (or Juice Directly):
If using a blender: Transfer your pitted cherries into the blender. Start blending on a low setting, gradually increasing the speed to high. Blend until the cherries form a thick, smooth puree. Take your time to ensure all the cherry flesh is fully processed, as this maximizes juice extraction. If your blender is struggling, add a tablespoon or two of the water now to help it along.
If using a juicer: Simply feed the pitted cherries directly into your juicer's chute. The juicer will efficiently separate the juice from the pulp. This method generally yields a clearer juice with less effort required for straining.
-
Dilute and Refine:
If you used a blender, add the three cups of water to the cherry puree in the blender. Blend again for another 30-60 seconds until the water is fully incorporated and the mixture is thinner and more liquid. The amount of water can be adjusted based on your preference for juice thickness and flavor intensity. For a richer, more concentrated juice, use slightly less water; for a lighter drink, add a bit more.
-
Strain for Silky Smoothness:
This step separates the beautiful cherry juice from any remaining pulp or skin particles. Place a fine-mesh strainer over a large bowl or pitcher. If using cheesecloth or a nut milk bag, line the strainer with it for extra filtration. Carefully pour the blended cherry mixture through the strainer. Use the back of a spoon or a spatula to press down on the pulp, extracting as much liquid as possible. You might need to strain it in batches or even a second time for an exceptionally smooth, pulp-free juice. Don't discard the pulp immediately – it can be used in smoothies, baked goods, or even composted!
-
Sweeten to Your Liking:
Once you have your strained juice, give it a taste test. Depending on the sweetness of your cherries and your personal preference, you might find it perfectly balanced. If you prefer a sweeter drink, now's the time to add a sweetener. Natural options like honey, agave nectar, maple syrup, or even a date syrup work wonderfully. Start with a small amount (e.g., 1-2 tablespoons), stir it in thoroughly, and taste again. You can always add more, but you can't take it away! For ease of dissolving, especially with granular sugar, you could use a simple syrup.
-
Chill for Optimal Flavor:
While you can drink your cherry juice immediately, it tastes infinitely better when chilled. Pour the freshly made juice into a pitcher or an airtight bottle and place it in the refrigerator for at least two hours. This chilling period not only makes the juice more refreshing but also allows the flavors to meld and deepen, resulting in a more harmonious taste.
-
Serve and Enjoy Your Homemade Creation:
Once thoroughly chilled, your homemade cherry juice is ready to be enjoyed! Pour it into glasses, perhaps over ice, and garnish with a fresh cherry, a slice of lime, or a sprig of mint for an extra touch of elegance. Savor the natural goodness and the satisfaction of having made such a delicious and healthy beverage yourself.
Customizing and Enhancing Your Cherry Juice
The beauty of making juice at home is the freedom to experiment. While the classic cherry juice is fantastic on its own, here are some ideas to customize and enhance your drink:
- Citrus Zest: Add a squeeze of fresh lemon or lime juice (or a slice) during the blending stage for a brighter, more zesty flavor that complements the cherries beautifully.
- Herbal Infusion: Blend in a few fresh mint leaves or a small piece of ginger for an aromatic kick.
- Spice It Up: A pinch of cinnamon or a tiny dash of vanilla extract can add warmth and depth to your juice, especially if using sweeter cherries.
- Blend with Other Fruits: Cherries pair wonderfully with other fruits. Consider blending them with apples, berries, or even a slice of orange for a unique fruit medley.
- Sparkling Delight: For a refreshing spritzer, mix your homemade cherry juice with sparkling water or club soda.
Storage Tips and Creative Serving Ideas
To enjoy your homemade cherry juice at its best, proper storage is key. Store your juice in an airtight container or bottle in the refrigerator for up to 3-5 days. If you've made a large batch and want to preserve it longer, cherry juice freezes beautifully. Pour it into ice cube trays for convenient portions or into freezer-safe containers, and it will keep for several months.
Beyond simply drinking it, your homemade cherry juice can be used in various ways:
- Smoothie Base: Use it as the liquid in your morning smoothie for an extra boost of flavor and nutrients.
- Cocktails & Mocktails: It's a fantastic mixer for alcoholic and non-alcoholic drinks. Think cherry juice mimosas, cosmopolitans, or virgin spritzers.
- Dessert Ingredient: Incorporate it into sorbets, popsicles, or even as a glaze for desserts.
- Health Elixir: Drink a small glass before bedtime to potentially aid sleep, or after exercise for muscle recovery benefits. To learn more about the incredible health advantages, explore our article: Unlock Cherry Juice Benefits: Simple DIY for Better Sleep & Health.
Making homemade cherry juice is a simple yet rewarding endeavor that brings a burst of fresh flavor and a host of health benefits right to your glass. By following these eight easy steps, you can confidently create a delicious, refreshing, and customizable drink that outshines any store-bought alternative. So, gather your cherries, get blending (or juicing!), and enjoy the vibrant taste of your very own homemade cherry juice. Cheers to a healthier, more flavorful refreshment!